This little exercise describes a really simple Photoshop technique which can be used to good effect in your images.
Firstly – a message regarding Photoshop adjustments and edits. I would advise you to always use non-destructive methods to make the changes, i.e. making use of Adjustment Layers and Masks. This allows you to retain all the original image information, adding your changes in new layers, and therefore giving you the ability to edit them further or delete them if you change your mind. If you edit directly onto an image you are changing the original pixel colours and will lose that information.
I’ll be adding plenty more about non-destructive editing, and posting some specific tutorials on adjustment layers and masks. Stay tuned.
But there’s more to an Adjustment Layer than simply making a colour or tonal change as a non-destructive ‘fix’ over the whole image. When you add an adjustment layer, it contains two elements. The first is the editable adjustment itself, and the white square next to it is a Layer Mask. Let’s look at one way in which this mask can be used to good effect.
Open an image you want to use and add a Black & white Adjustment Layer by clicking on the ‘create new fill or adjustment layer‘ shortcut at the bottom of the Layers panel. The panel should look like the one shown below.
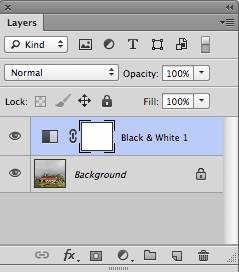
Adjustment layer added, showing the white layer mask thumbnail active
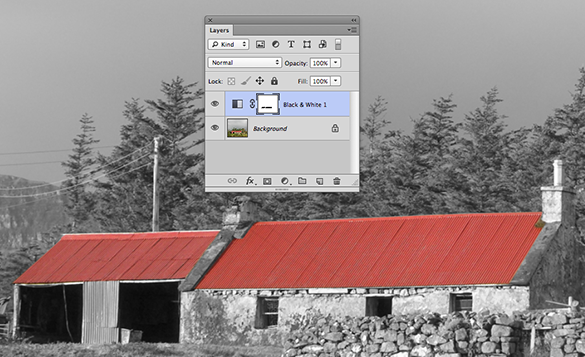
In the Properties panel choose a filter Preset which gives your image a good tonal range across the black & white adjustment. In the image above I used the Green Filter Preset.
Make sure the white layer mask thumbnail is active in the adjustment layer – it should have a double line around it as shown above – and choose the Brush tool with a hard edge, at a size which will allow you to paint into the areas of the image where you want to bring colour back. If it’s a small area or a tricky edge you’ll need a fine brush.
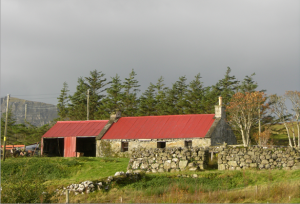
With a foreground colour of Black (shortcut D on the keyboard for the default colours) paint over your chosen areas of the image, and you should see some of the original colour starting to reappear. Remember to paint into the image, not the Layers panel! As you can see below, I wanted the red roofs of the buildings to come through against the black and white of the rest of the image.
When you’ve finished painting, save the file with the layers intact to preserve the work.
Hopefully it’s clear what you are doing – you’re masking an area of the black and white adjustment, allowing the original colour of the image, in the layer underneath, to show through.
As the changes are non-destructive you can experiment with the brush and the mask without affecting the image itself. For example, adjusting the brush opacity, say down to 30%, will make the colour show through as a subtle tint, rather than a solid (although the more you paint over the same area with a transparent brush, the more colour will come through). Using a soft edged brush will give a softer edge to the colour areas.
Switching your foreground colour from black to white (shortcut X on the keyboard to swap foreground and background colours) will paint some of the mask out and bring the black and white back. Play around with this to get the feel of it.
When you are happy with the area you have painted and have tidied up the edges, you can save the file. Remember, keeping the layers intact will mean you can go back into this image at any time and add more mask, or take some away, or delete the adjustment layer altogether to revert the image back to full colour.
Let’s hear it for non-destructive editing! Total control over the image changes, very versatile, great fun . . . and really easy to use.


